Well, look at that, you got your buck. Nice shot
and a short tracking job, too. Go ahead and celebrate. You deserve it. Snap some quick pics. Send some texts. Just don’t be too long about it, though, because you need to get after Job No. 1 once a successful hunt is over, which is field dressing your deer.
For the best-quality venison
, you want to open up your buck and get the innards out as soon as possible, so the carcass can start cooling right away. If it’s chilly—or better yet, cold—outside and you’ve got a nearby buddy or two already on their way, it’s fine to wait a little while for them. Field-dressing a deer is definitely easier with a helper. On the flip side, you can absolutely handle the job on your own if it means waiting an hour or more. (Your buddies will still be useful for dragging and loading—and patting you on the back.) So, let’s get to it.
How to Field Dress a Deer: A Basic 6-Step Field Guide
The details of how you go about each step in the field-dressing process can make a huge difference, and if you want to dive into the nitty gritty of the process, all you have to do is keep reading. On the other, if you’re, say, just a little rusty, and you only need a reminder of the basic steps and their order, here is a simple field guide to follow.
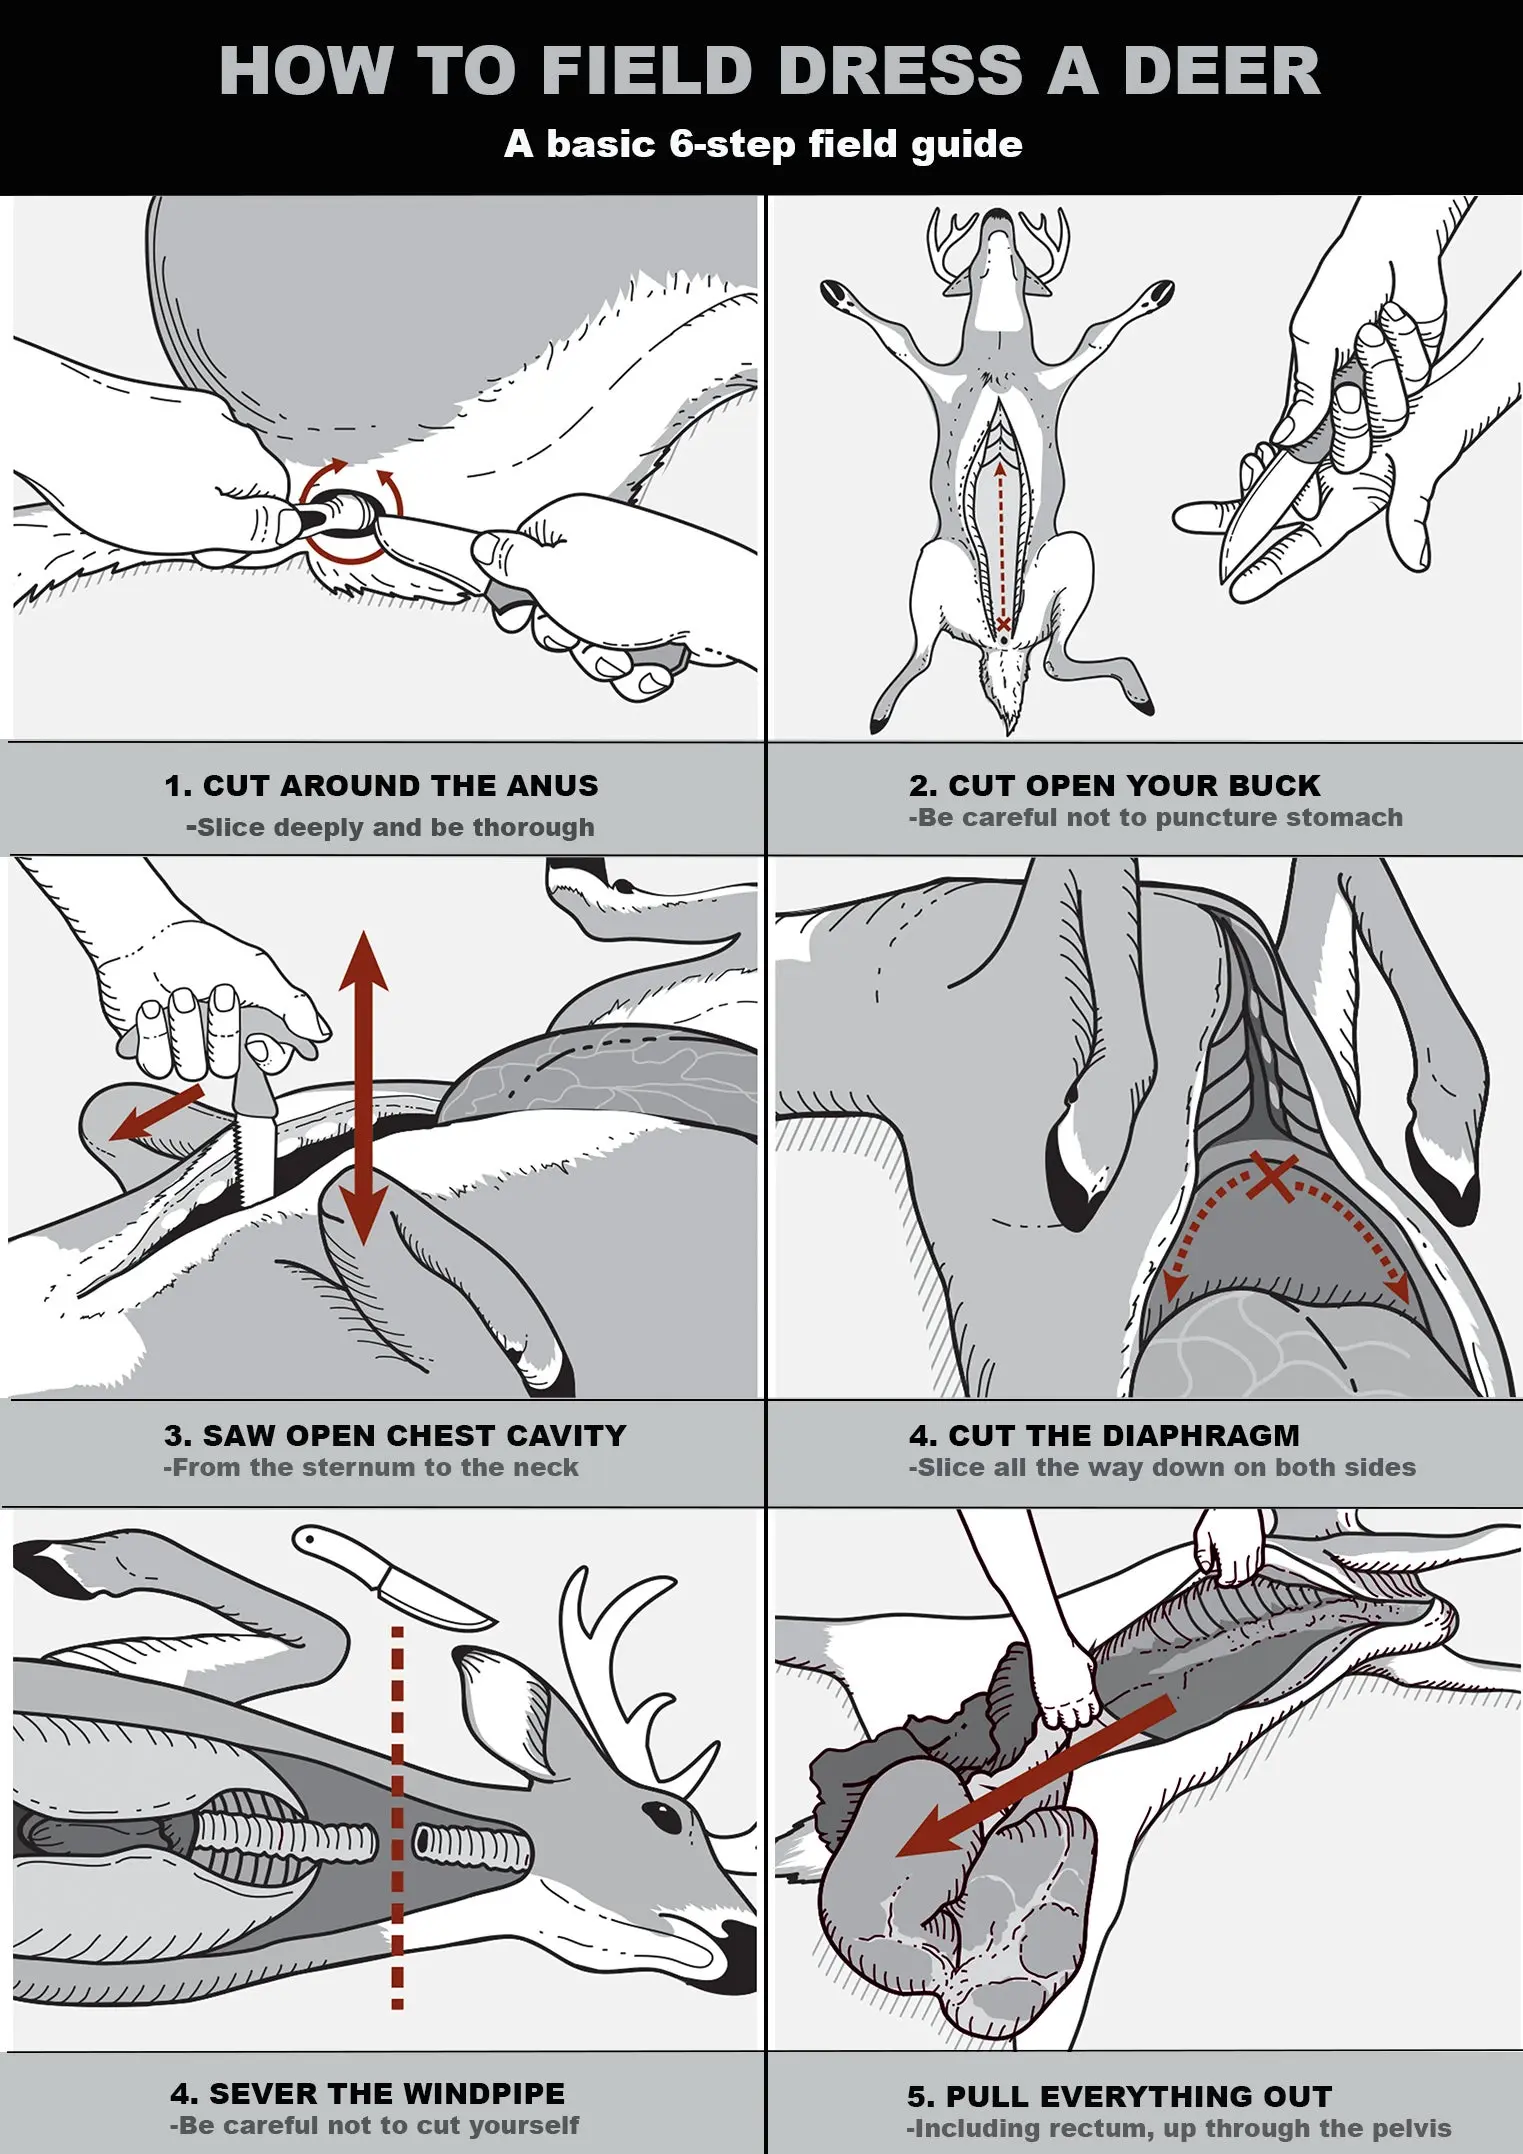
Pete Sucheski / Dave Hurteau
Table of Contents: The Process of How to Field Dress a Deer, In Detail
Cut Around the Anus
Unzip Your Buck
Saw Open the Chest Cavity
Cut the Diaphragm
Cut the Windpipe
Pull Everything Out
Alternative methods
How to Gut a Deer the Fastest Way
How to Use the Gutless Method
Frequently Asked Questions
How to Field Dress a Deer, Step-by-Step
Before you get started, position your buck so its head is a little uphill of its keister, if possible, and then turn him belly-up. (The caveat here is that some people find Step 1 below easier to do while the deer is still on its belly, so if you want to do that before turning the deer over, go for it.) Okay, you got this. Just follow the 6 simple steps below.
Step 1: Cut Around the Anus
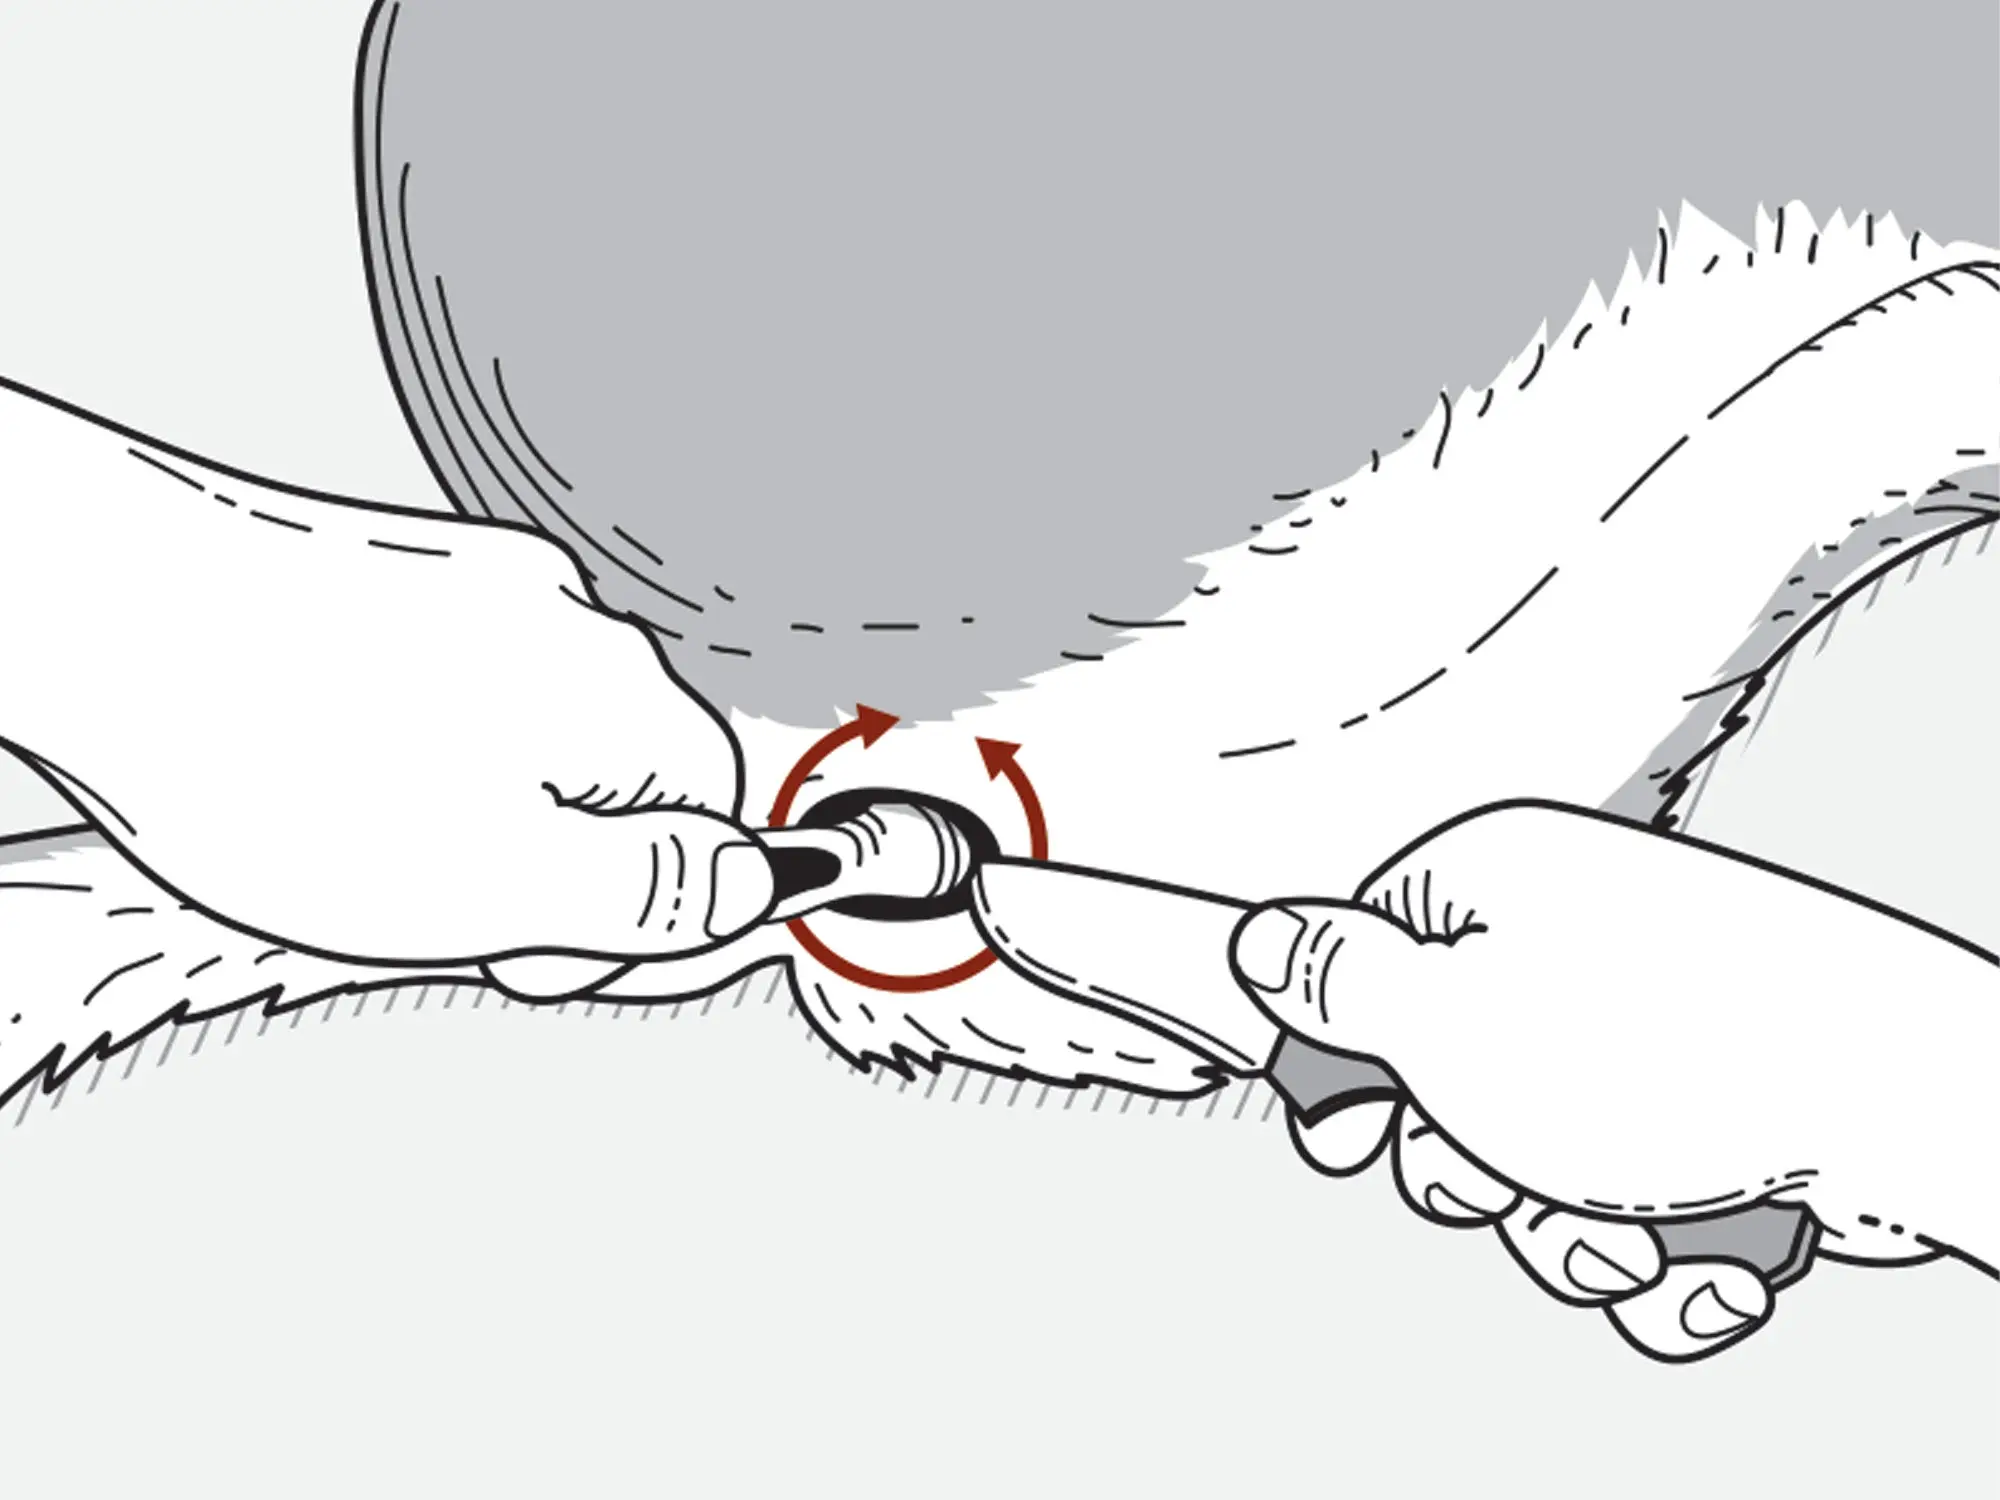
Illustration by Peter Sucheski
Start with the poop-shoot. You know, the bunghole, the sphincter. Do we have to draw you a picture? Okay, see the picture above. Cut all the way around the anus and do a thorough job of it. Take two or three trips around barn. Go ahead and grab your buck’s bung and give it a nice tug, too, while you’re slicing, to make sure it’s fully separated and free. A lot of detail-oriented people will tie the terminal end of the rectum off with a string at this point to avoid any caca from falling out later in the gutting process. But (butt?) if you’re anything like me, you forgot the string. That’s okay, you don’t really need to tie anything off.
Alternative Step: Some people start with a buck’s twig and berries. (We decided against drawing a picture of these.) The idea is to cut off or around your buck’s package (around if your state requires you to keep proof of sex attached; check regs) to get at the urethra. You then pull down on the urethra while making careful cuts with your knife all the way to the pelvic bone, freeing the tube completely, along with the anus, so both will pull out more easily later. Some folks add this step—either before or after cutting around the anus—while many others skip it altogether. I’ve done it both ways, and both ways work.
Step 2: Unzip Your Buck
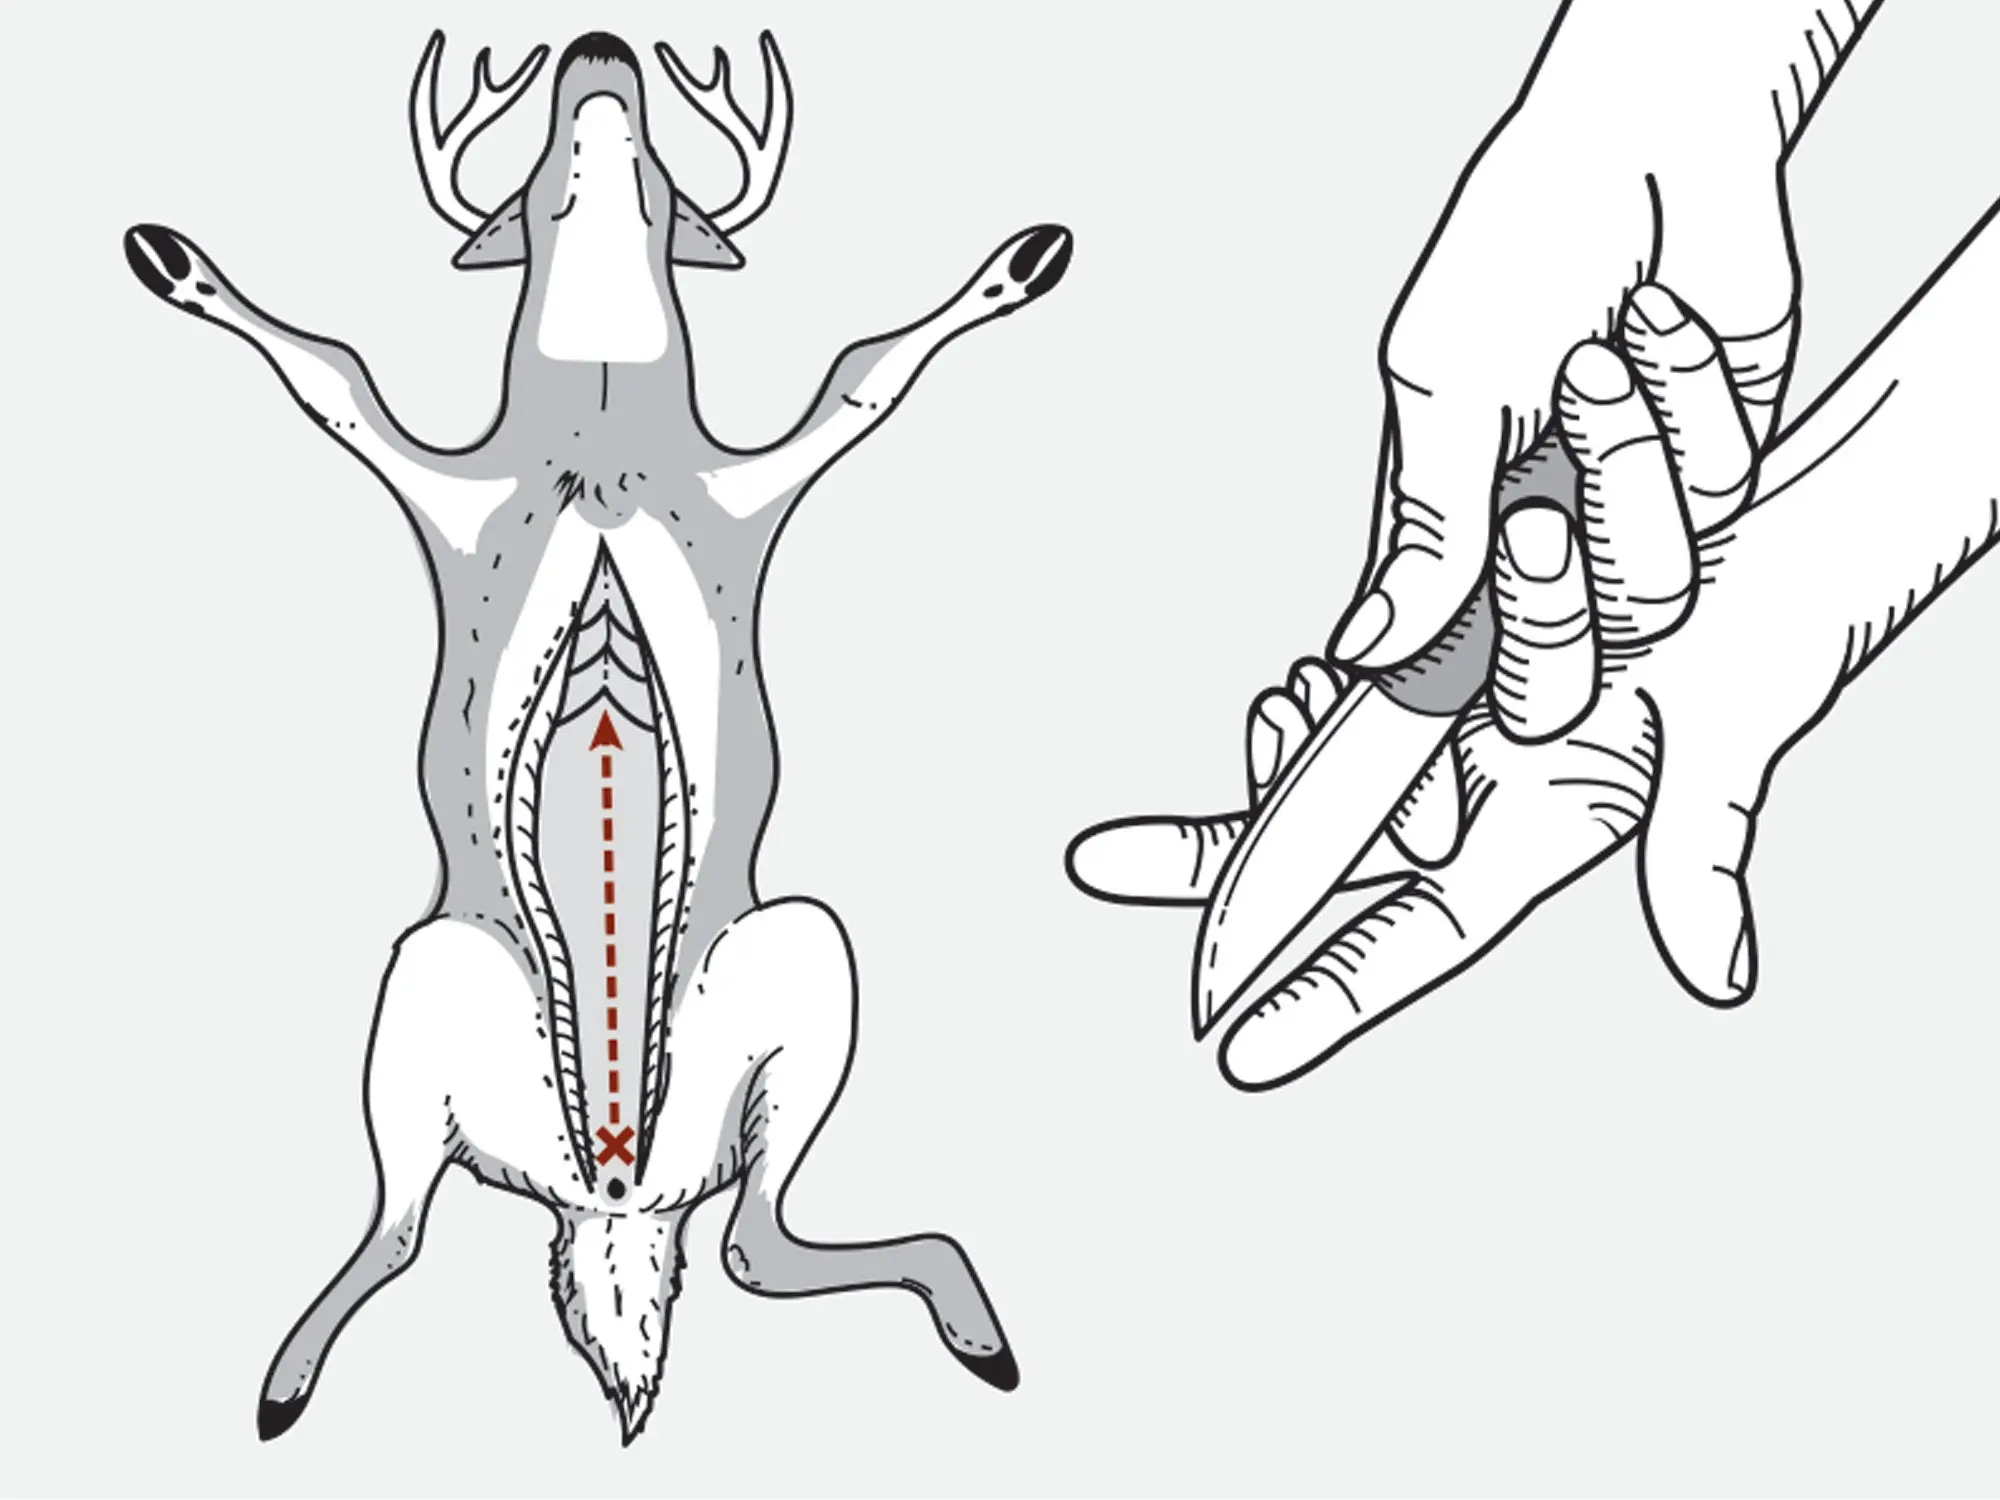
Illustration by Peter Sucheski
Make a very small incision at the base of the belly, being careful not to puncture the guts. You just want to get through the hide and the abdominal wall. That’s it. Then, making a V for victory with your off hand, stick your two extended fingers into the incision and use upward pressure to open some space between the abdominal wall and the innards. Next, run your knife, blade up, between your fingers, opening the gut all the way up to the sternum. If you have a good, sharp gut hook on your knife, it can make this cut easier and quicker.
Note: Some people make this long cut in the other direction, from the sternum down to the pelvis, which guarantees against puncturing the guts on the initial incision. I’ve never found this necessary, but I’ll admit that it does make a certain amount of sense.
Step 3: Saw Open the Chest Cavity
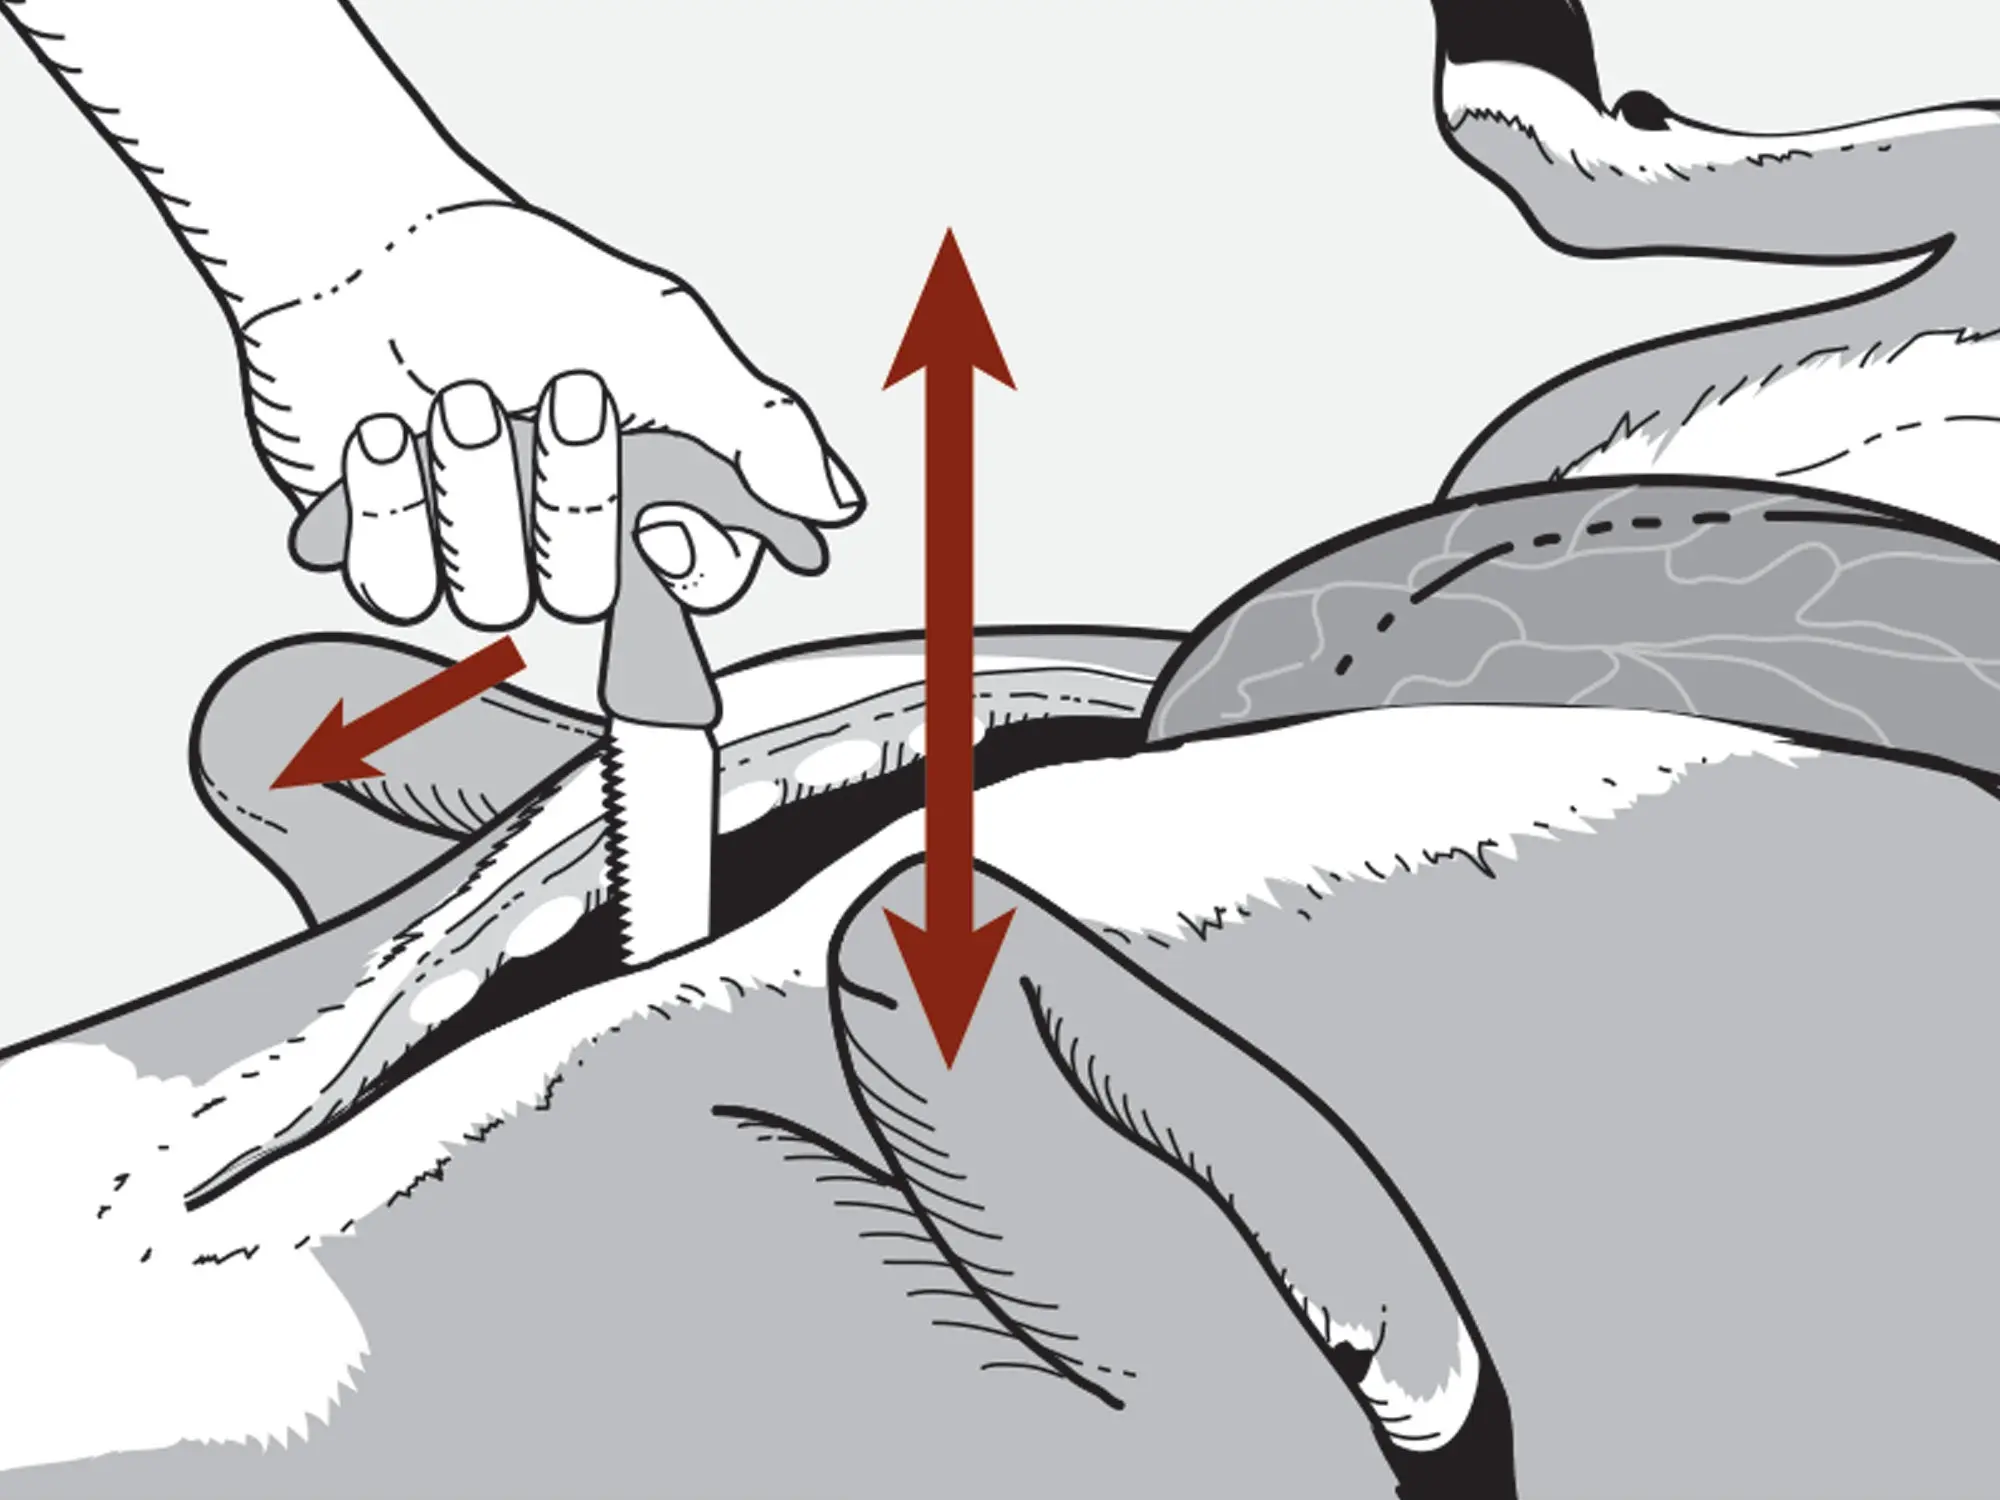
Illustration by Peter Sucheski
While I may forget the sphincter-string or a pack of field-dressing gloves, one thing I try very hard to remember, and often do, is a small saw to open the chest cavity. Start at the sternum and work up near the base of the neck. Once you’re done sawing, it doesn’t hurt to pull open the chest cavity some and/or prop it open with a stick.
Step 4: Cut the Diaphragm
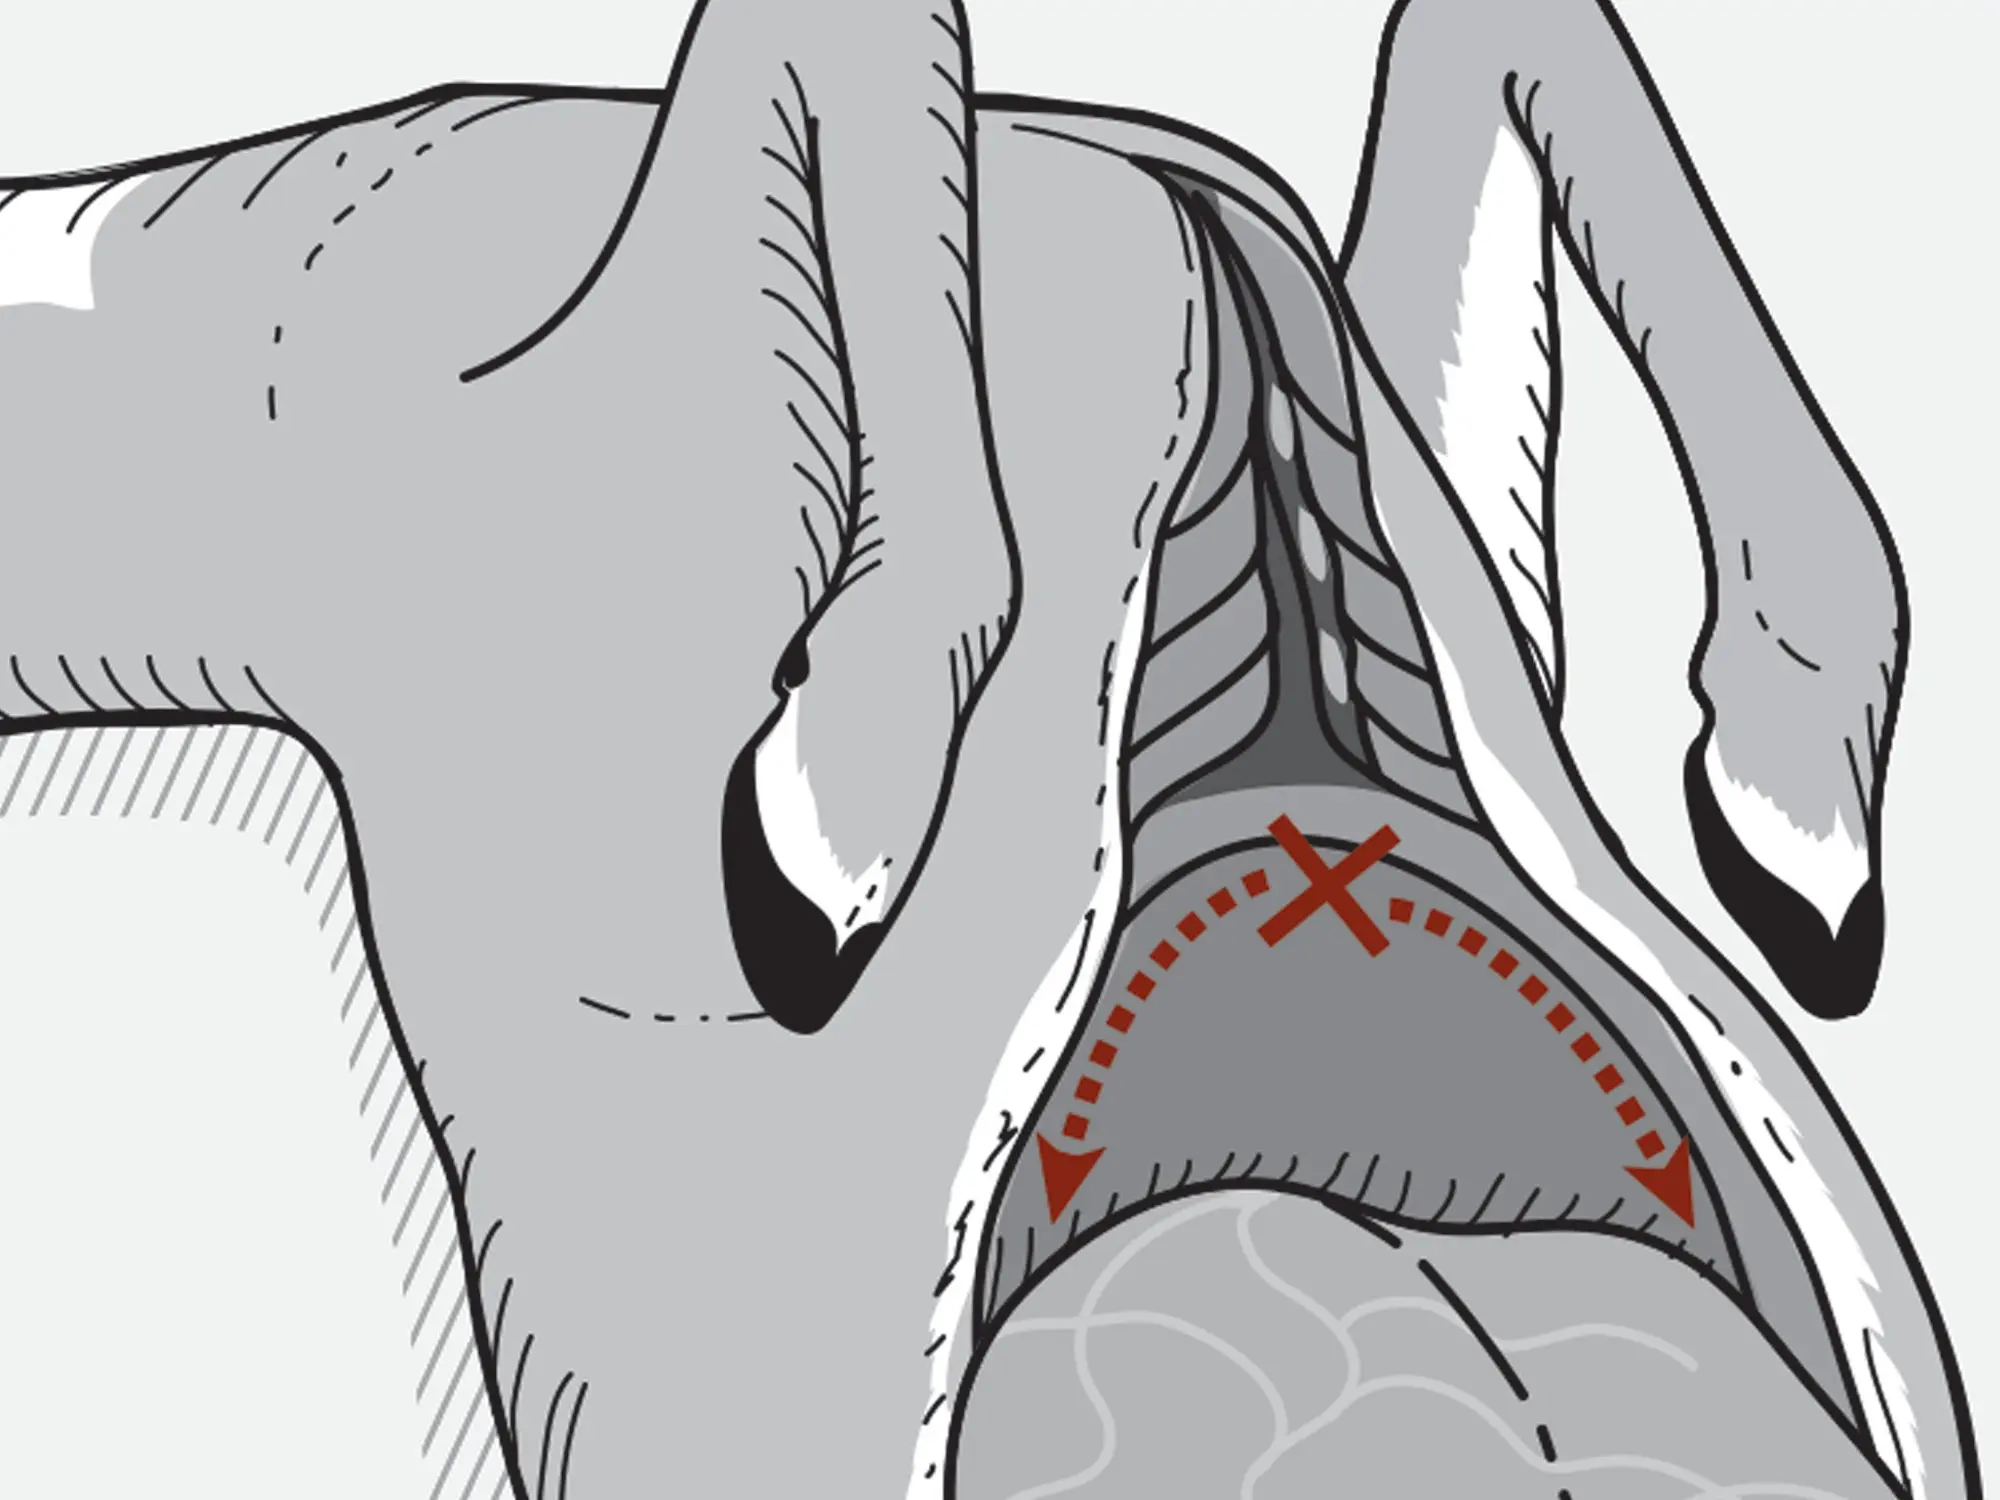
Illustration by Peter Sucheski
One big advantage to opening the chest cavity is that it makes it easier and safer to get at the windpipe. But every bit as important is that Step 3 in learning how to field dress a deer also makes it much easier to see and cut around the diaphragm, which is the thin, fleshy membrane that separates the heart and lungs from the stomach and intestines, etc. Slice along each side of the diaphragm, all the way down along the spine, where it tends to hang on stubbornly. Do this job thoroughly or you will have trouble later.
Step 5: Cut the Windpipe
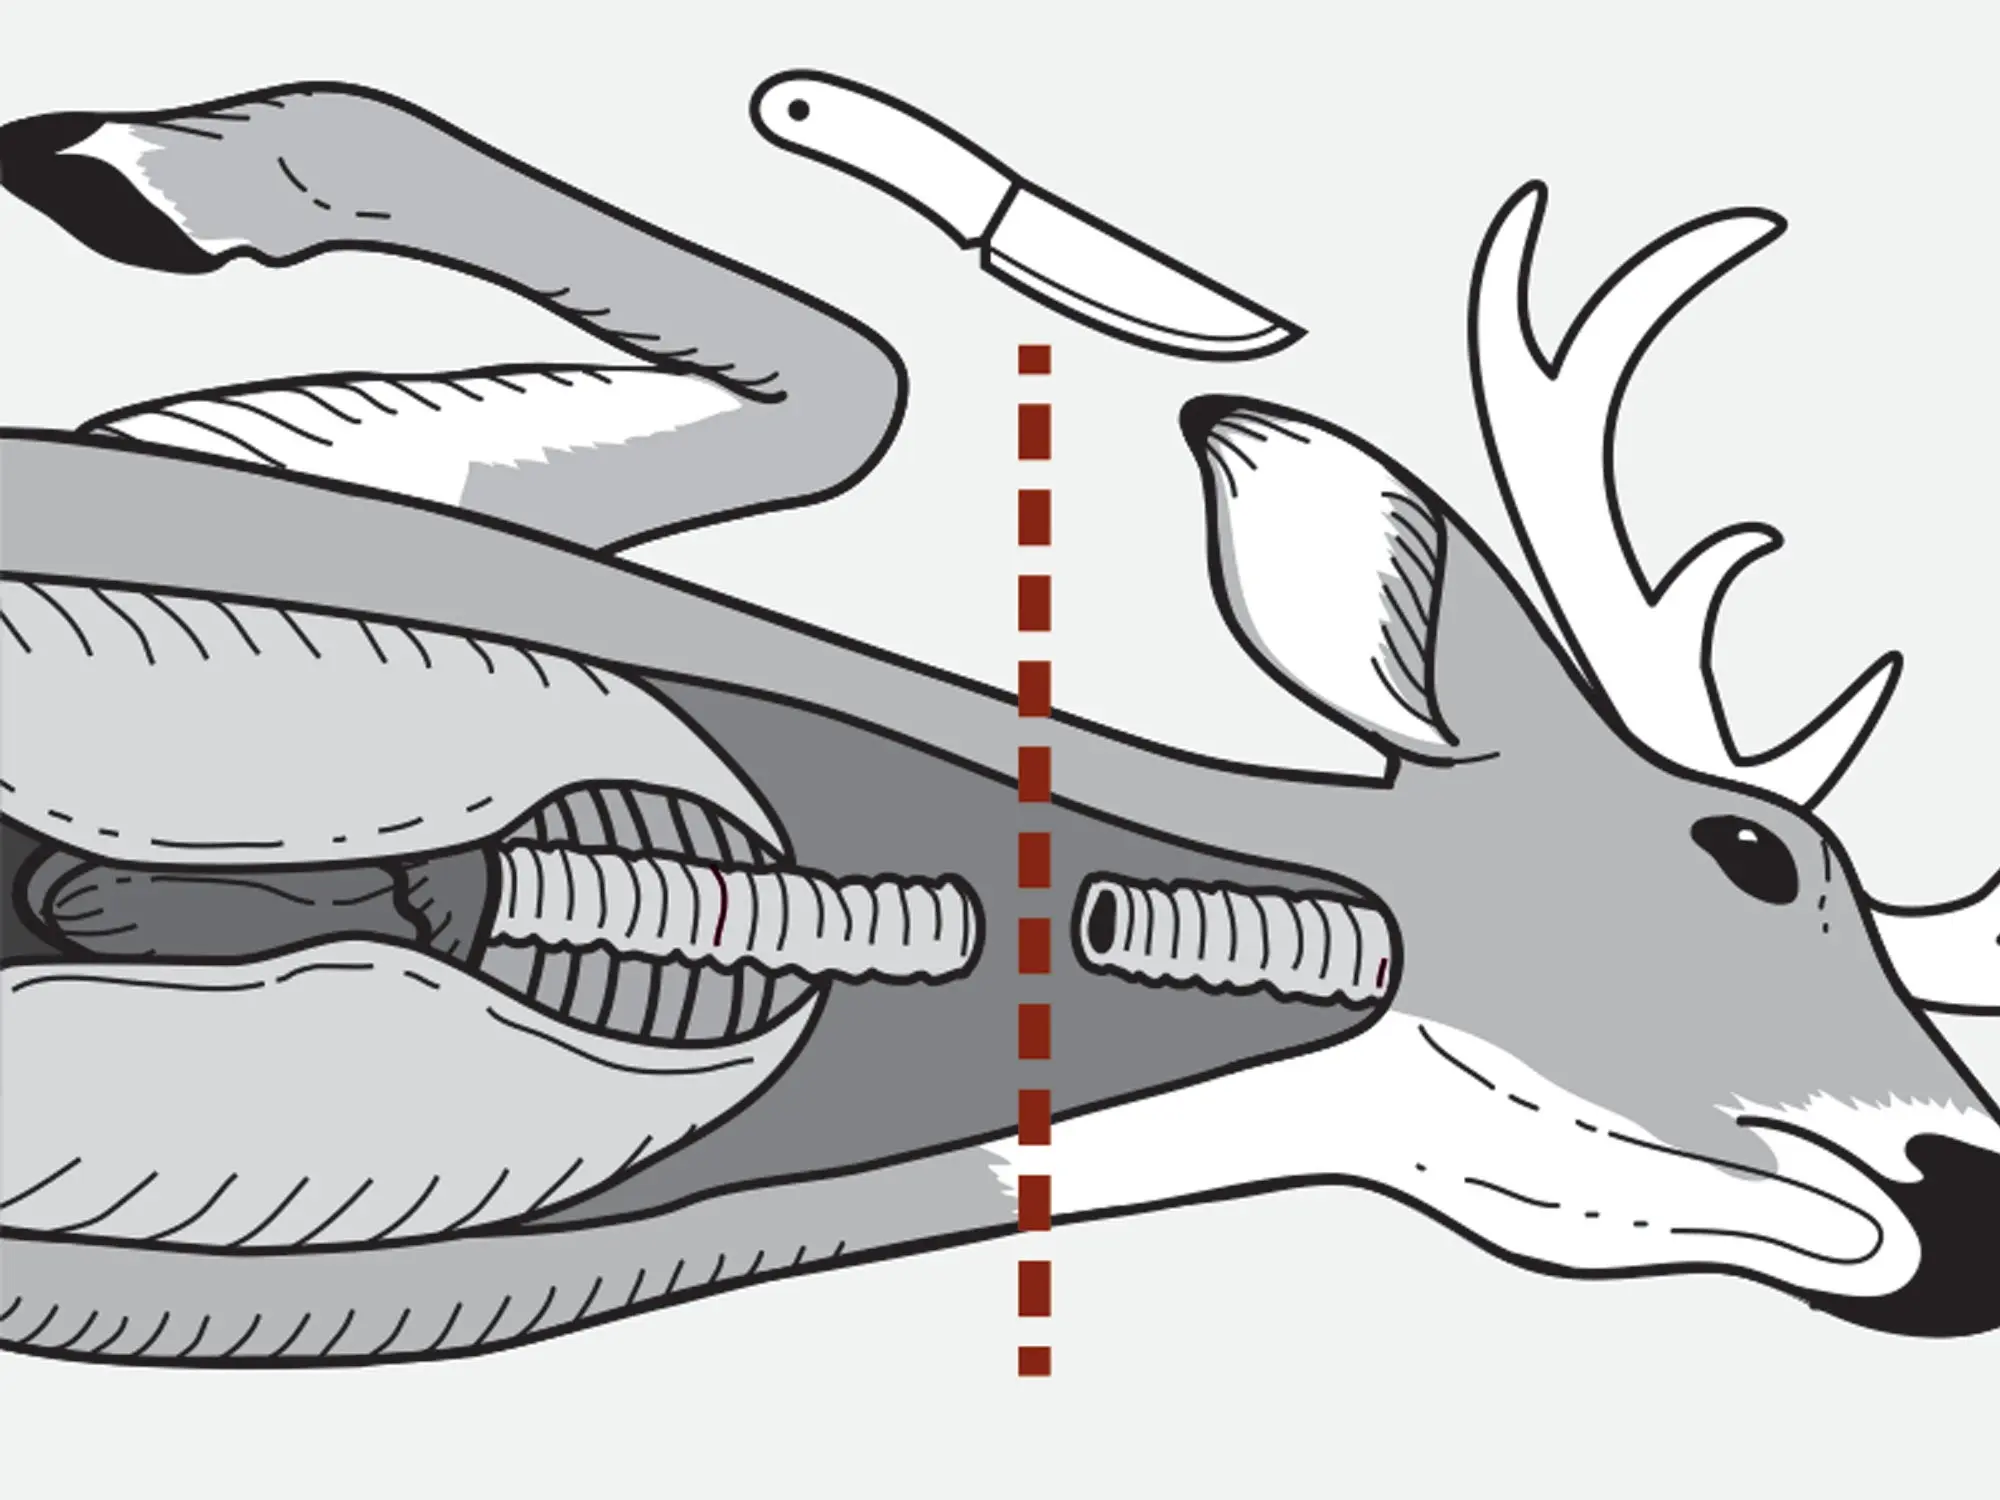
Illustration by Peter Sucheski
Now, reach into the chest cavity, up toward the neck, and sever the windpipe, which will be easy to see and get at if you remembered your saw. (If you didn’t remember your saw and cannot open the chest cavity, start by reaching up into the cavity with your off hand—far enough to get your elbow dirty—and grab the windpipe. Next, carefully slip your knife hand up in there and, without mutilating yourself, cut the windpipe free. Then carefully retract your knife hand.)
Step 6: Pull Everything Out
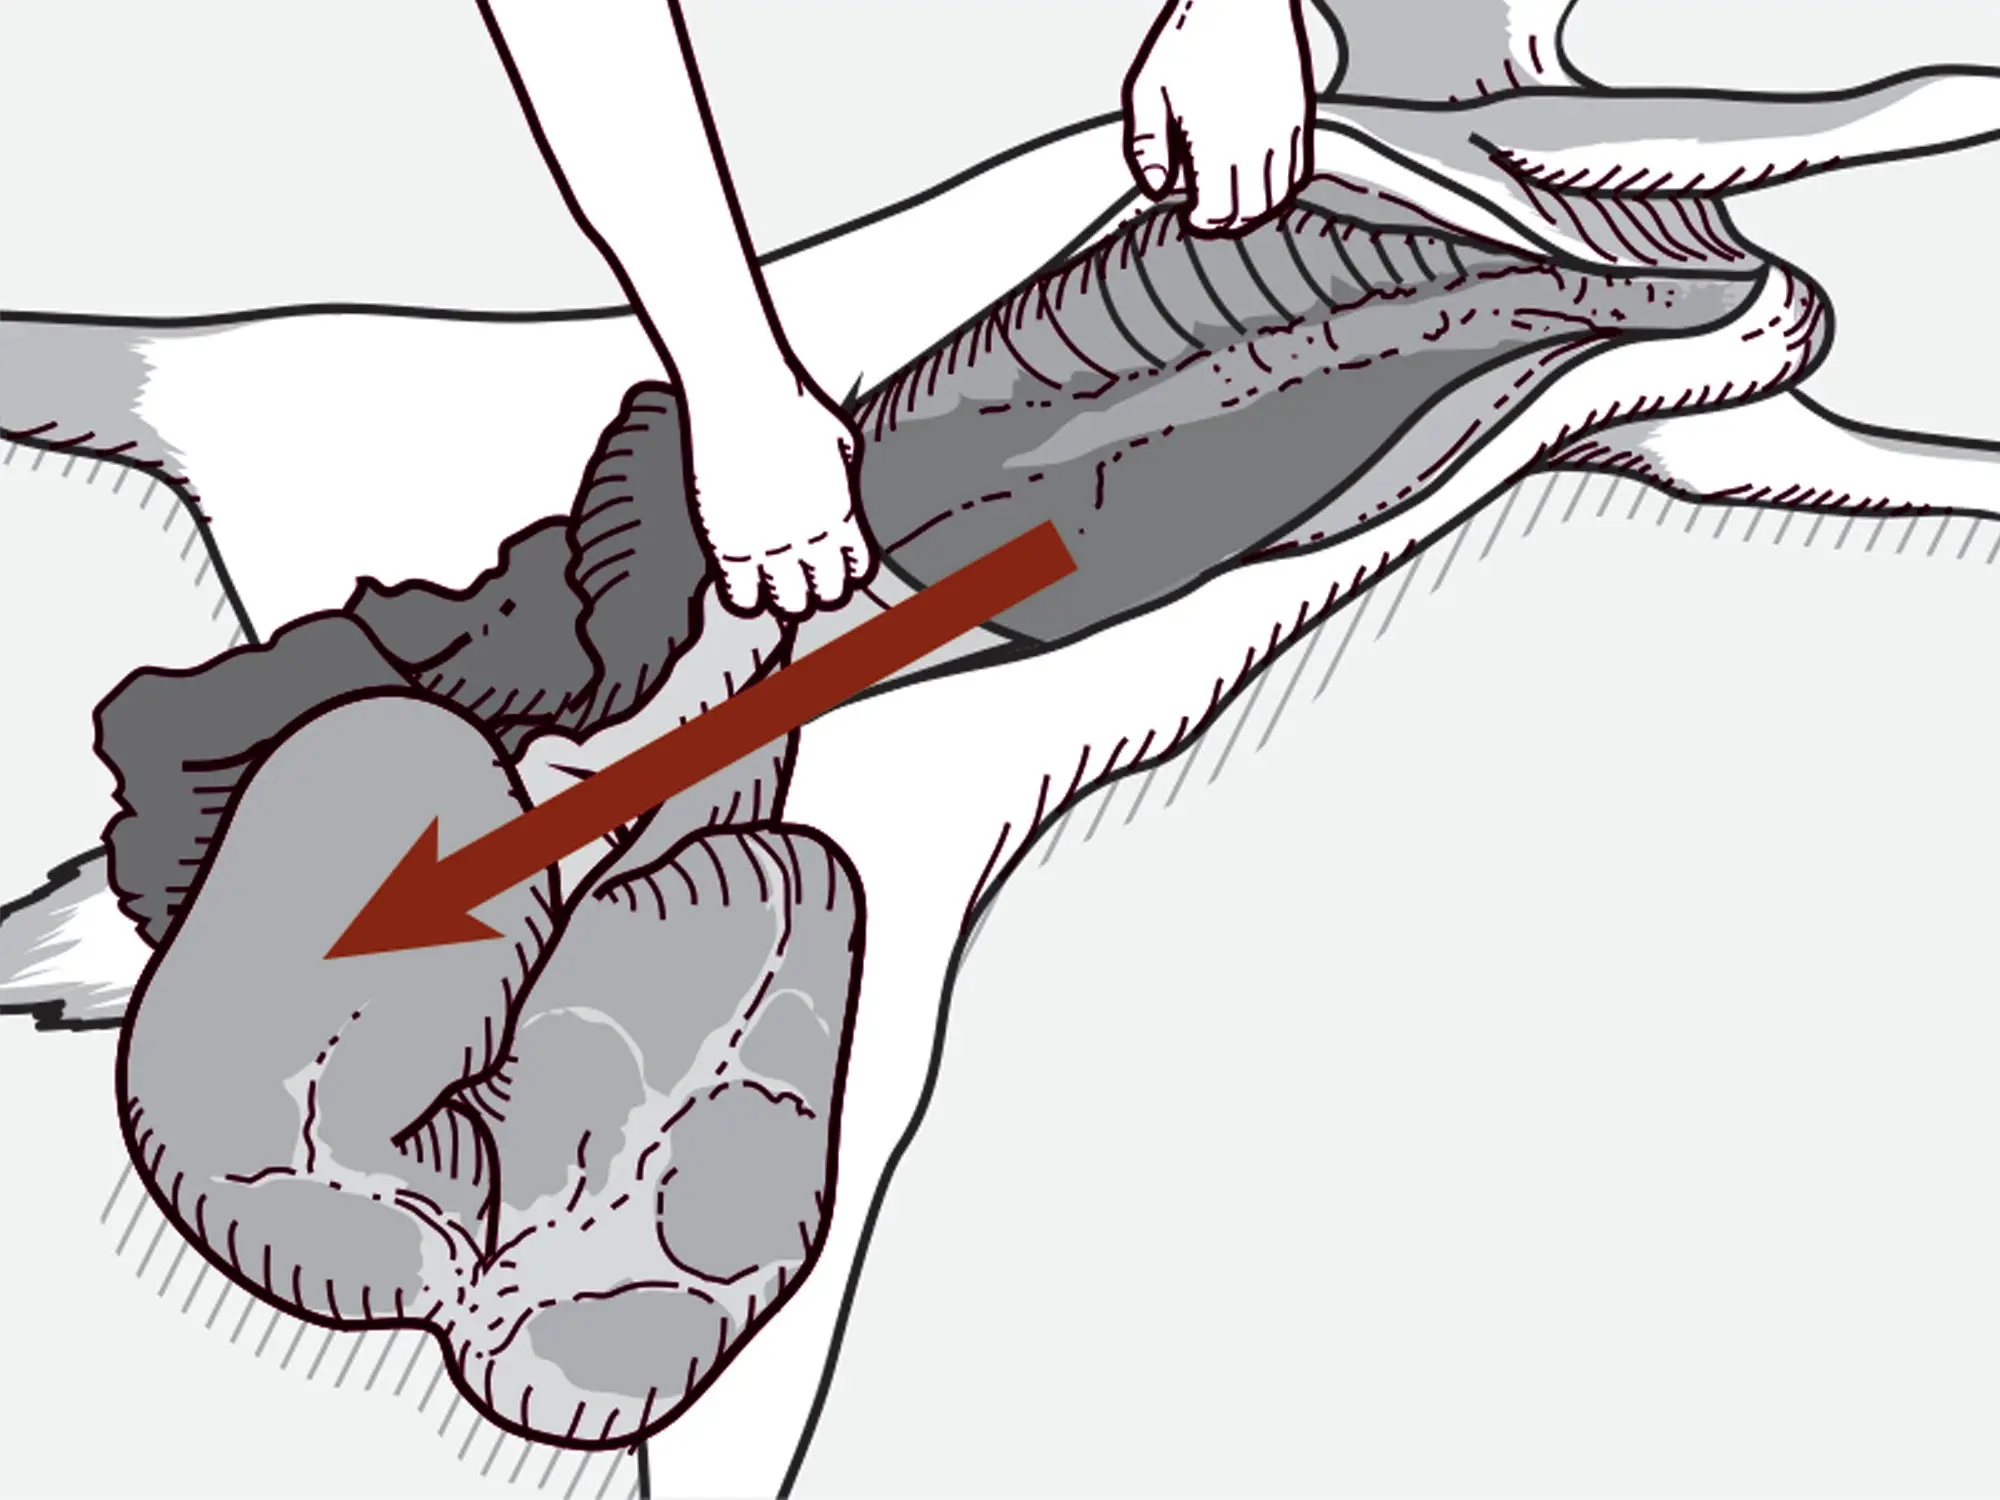
Illustration by Peter Sucheski
Turn the buck on its side, then pull down on the windpipe, grabbing and tugging on any organs or guts as necessary, and flop/slop the whole lot of it out of the cavity. If you get stuck part way, it’s probably because you didn’t quite cut the diaphragm totally free, so make the necessary extra cuts as you pull until it all comes loose. At this point, the only unwanted bits left in the deer should be what’s still holding on down in the pelvic area. It doesn’t hurt to be a little careful here. Gently poke around to find the bladder, or piss sack, as it may be called at your deep camp, too. Pull that out gently, being careful that it doesn’t explode. Finally, pull the rectum and urethra out from under the pelvic bone, cutting away any connective tissue as necessary. If you did Step 1 well, it should slide right out. And there. You now know how to field dress a deer.
**Related: Step-by-Step Guide to Butchering Your Own Deer
**
How to Field Dress a Deer, Alternative Methods
Just for fun, I conducted a small survey of buddies and colleagues—people I trust, including experts and guides—and asked them to run me through the steps they take to gut a deer. On one hand, almost all of them described some version of the process above. On the other, no one explanation was identical any other. Some omitted or added a step or did them in a different order. There’s no one perfect way. Some even said that they skip the first and last step altogether, which brings us to…
How to Gut a Deer the Fastest Way
If you want to see someone unzip a deer in a matter of seconds, watch a seasoned western guide. I’m sure the method I’m referring to is used in other parts of the country, but it seems like the farther west you go, the more likely your guide will just ignore the poop-shoot and the entire pelvic area and simply unzip the belly, cut the diaphragm, reach up to sever the windpipe, and pull everything out. Finally, they’ll locate the bladder, cut it away carefully and just leave the rectum and urethra where it is.
Should you do it this way? Well, there’s an important caveat to this method. Western guides also tend to be fanatical about getting the skin off a deer as soon as possible. The second they get back to the hanging shed, they’re going to hoist your buck up and get skinning. And they’ll remove what innards they left under the pelvic bone then. In other words, it isn’t there long enough to do any harm.
If you plan to hang your deer skin-on for a while, it’s better to remove the rectum and urethra in the field, as in the process above. One of my buddies, Steve, whom I surveyed, spent years butchering deer professionally, and he told me that the deer whose inner hams started smelling bad and turning green the quickest were the ones whose hunters left innards under the pelvic bone. So, if you do skip these steps in the field, make sure you deal with them as soon as you get your buck hung up at home.
How to Use the Gutless Method
You don’t actually have to gut a deer to get your meat. You can take the backstraps, hams, front shoulders, and even the tenderloins without ever opening up the belly. But seeing that this article is mainly about how to field dress a deer, I think we’ll skip the details on how not to gut a deer. It’s worth mentioning, though, so that you know it’s an option, and to point out that you can get all the details right here
or watch the video the gutless method
above.
Related: How Long to Hang a Deer for the Tenderest Meat
FAQs
What is needed to field dress a deer?
You don’t need much. But here’s a list of things that will make the job easier and a bit less messy.
with a blade between roughly 2.5 and 4 inches long
. A drop-point profile is generally preferred but a clip-point is fine too. If that knife has a good gut hook, so much the better. 2) A 6-inch or so length of string or cord if you want to tie off the anus. 3) A small game saw is handy for opening the chest cavity (and splitting the pelvis if that’s your thing). 4) Disposable gloves. Available at any outdoors store, a package of field-dressing gloves will include a pair of long, loose-fitting plastic gloves/sleeves that go up to your elbows and a smaller tight-fitting pair of latex gloves that go over the first. 5). Water and towel (or paper towels). These are handy for cleaning yourself (especially if you forget the gloves), as well as your knife and saw—and for tidying up your buck for pictures.
Do you need a saw to field dress a deer?
Nope, you don’t. In fact, I would say that the vast majority of hunters do not use a saw when gutting a deer. Just follow the step-by-step instructions above, which explain exactly what to do if you have a saw and if you don’t.
Should you split the pelvis?
If you do have a saw, using it to split the pelvis will make removing the rectum, urethra, and bladder neater and easier, with less tugging. You can make this part of the last step above or do it right after Step 1. Either way works. That said, I’ve always found that if you do a good job of Step 1, slitting the pelvis isn’t necessary.
What should you do with the gut pile?
Just as hunters have different methods for how to gut a deer, they have different ideas about what to do with the gut pile afterward. I know some guides and expert colleagues who just leave the gut pile where it is after field-dressing and drag the buck away. I know others who will scoop it into a garbage bag or a bucket and drive it to another location, for fear that it will put deer they plan to hunt on alert or will attract coyotes that will put them on alert.
Who’s right? Who knows? Go with your, er, gut. If you tend to be on the highly cautious side when it comes to alerting deer, take it away. Personally, I sort of split the difference. I’m not going to go to the trouble to scoop up a gut pile and relocate it, but if I’ve got a quad or I can drive my vehicle right up to my deer, I’ll use the machine to drag it well out of my immediate hunting area, usually to the edge of a big field where I know deer don’t spend a lot of time, and then I’ll gut it there.
How long will a deer last after being field dressed?
Under the right conditions, a deer can last, unspoiled, for six weeks or more. Very few hunters hang their deer for that long, but professional meat processors who have walk-in coolers kept at a perfect temperature may. How long you should hang your deer depends almost entirely on the temperature outside or in your garage or shed. If temps stay between 45 and 32 degrees, you might hang your deer for a couple weeks or more. But three to seven days is closer to the average. If temps are going to get much above 50, it’s best to go ahead and butcher the deer, or break it down and put it in a cooler.
How soon should you field dress a deer?
I addressed this in the beginning of this story, but it’s worth repeating here at the end. You should field dress a deer immediately after recovering it. This is especially important if it’s warm out or if it took an unusual amount of time to find the deer. The one exception, as noted, is if it’s cool out and you’ve got a buddy or two on the way to help.
The No. 1 reason to field dress your deer right away is so the carcass starts cooling immediately to ensure the best meat later. But there’s another reason, which is to get the chore out of the way so you can get to the photoshoot. If you shot your buck in the morning and you’re done field-dressing, now’s the time to drag or drive your buck to a purdy spot and take some pictures worth saving and sharing.
If you shot your buck in the evening and it’s dark out by the time you’re done, get the best pictures you can now, and as long as it will be chilly overnight, hang you buck up so it will keep cooling and plan the photoshoot for the morning. The deer will be a little stiff the next day and you may need to wrestle with it a bit to strike the right pose. But if what is most important to you about any deer hunt is the meat and the memories, it’ll all be worth it.
![Field & Stream [dev]](https://images.ctfassets.net/fbkgl98xrr9f/1GnddAVcyeew2hQvUmrFpw/e4ca91baa53a1ecd66f76b1ef472932b/mob-logo.svg)


